

Hi All
Thanks for popping along to read my 1st ever tutorial for Simple Sew Patterns.
Today I’ll be showing you have to make The Skater Dress which was a freebie from Issue 8 of Love Sewing Magazine, so if you don’t have chance to buy the mag you can buy the pattern here for £4.99 with free postage…Bargain!
Now first things, make sure you launder your fabric prior to you starting to cut your pattern pieces out as this allows for shrinkage as it would be a complete shame not to do this before hand and to make a beauty of dress, wear it and love it then to put in the wash where it’ll shrink and the dress would be too small to wear!
First open up the envelope and make yourselve a brew and read the instructions and make a list of materials/equipment you need if you don’t have them already so no last minute dash to the local habersary store or waiting days for online orders lol.

Here is what I’ve used:
2.5m of 60″ Fabric from Sew Scrumptious
0.5m Iron on medium-weight interfacing
Guterman Thread – There’s no other thread like it in my opinion, you do need good quality thread as it does show in your creations.
16″ Concealed Zip or if you dont have that size available by a bigger one and you can easily alter it to 16″ by heating up a knife to get hot and gently press on the teeth of the zip of where 16″ is from top of the zip and hey presto!
Paper Scissors – For cutting Pattern Pieces out as these will blunt and make cutting fabric out quite uneven!
Fabric Scissors
Pins
Tailor’s Chalk – For marking on fabric that soon rubs away
Greaseproof Paper – Tracing the Pattern onto as for some reason i don’t want to chop up my paper patterns just in-case i need to make for a gift. Also a great alternative to expensive to Dress Making Paper.
French Curve – handy for getting those straight lines whilst tracing or to grade in between sizes if your measurements are in between sizes but i’m lucky enough that with Simple Sew i can use a straight size 10.
Pencil
Weights – for holding down pattern pieces in place without pin marks. I picked my up for 30p each from Boyes.
Iron and Ironing Board
And last but not least the Trusty Sewing Machine, Normal sewing foot and Concealed Zip Foot as using a normal zip foot will not have the same neat effect. I picked mine up from Amazon for £4.99.
Now then, you can go ahead and cut straight into the paper pattern to the size you require but if your like me and like to keep my paper pattern intact then trace your pattern onto the paper and to make sure you add any nothces/darts/markings onto the paper then cut out like shown below:


Fold fabric Right Sides Together selvedge to selvedge and places the pattern pieces on the top. Align the straight grain line on the pattern piece to grain of the fabric and either pin down the pieces or use pattern weights like i have its up to you! Then of course cut away!

Then iron on interfacing to the wrong sides of the fabric, there are only 3 small pieces to do and just a tip put a tea towel over the fabric and interfacing when ironing just incase you put it the wrong side as it makes a right mess of the iron and also a nice heat that itsnt too hot that would scrunch up the fabric.

Once you have cut out the pieces, transfer the markings onto your fabric using the tailors chalk, A handy tip for the darts i put a pin through the paper and fabric then gently pull away the paper to leave the pin in then match up the lines to the bottom of the dart…simples 🙂


Also i like to overlock (if you don’t have an overlock stitch on your machine just use a small zig zag stitch that works a treat too) the raw edges which are bottom edge of the facings, sides and bottom edge of the pleat panel – sides of the front bodice and bottom of the front and back bodice, skirt top, side seams and bottom edge of the skirt pieces that will in contact of me wearing the dress i.e. the seams so they have a lovely soft edge to them so you don’t have to fiddle around doing them whilst constructing the dress together.

Now finally onto the construction!!
Make sure you have plenty of thread in your bobbin as there isnt anything worse than getting halfway through sewing a long stretch of garment and to find you have only sewn half of it, trust me this has happened many times LOL
Make sure you have sewn all your darts in place before hand on your bodice pieces – to sew a dart always start at the bottom and back stitch to secure then stitch along to the centre front then dont back stitch here just tie the ends together as this prevents the dart looking bulky not a good look to have madonna style points LOL! Then press them so that they are facing the centre.

With the Right Sides Together pin the front and back bodices at the shoulders then press the seams opens. It is a good tip to keep pressing as prompted as you go as it keeps the garment nice and crisp and easier to sew.
Now join the Front and Back Neck Facings Right Sides Together and again press the seams open.

With the Right Sides Together pin the neck facing to the Bodice neckline then stitch into place. Clip notches into the inside edge of the neckline facing down to the stitch line just don’t cut into you stitching as this will make it lay flat and not have bulky bits when turning the facing out. So turn it back so it inside of the dress so now you have a lovely neat neckline and of course press flat! 🙂

Now onto the sleeves….a must admit I’m not a fan of sleeves as i have only made 2 sets of sleeves in all of sewing experience so far!! But these went in lovely as long as you take your time and not rush ☺
Sew a Running Stitch (basically a stitch that isnt back stitched its just there to hold the fabric together until you have the permanent stitch in place – its stop the fabric from moving around) on the sleeve curve and pull on the threads slightly so it will fit into the curve of the armhole on the Bodice.

With the Right Sides Together stitch the sleeve into the armhole curve on the Bodice

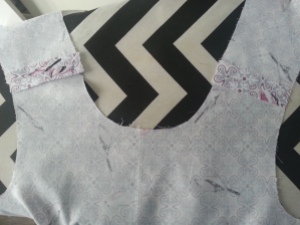
Once you have sewn in both sleeves it should look like this:

Now we are getting somewhere! Now to join the front Skirt to the Front Bodice with the Right Sides Together, then sew the Left Back Bodice to the Left Back Skirt and then repeat with the Right Back Bodice to the Right Back Skirt.

No in the instructions it doesn’t tell how to join the sleeves together so here we go:
Pin with the Right Sides Together of the Sleeve and Left Hand Side of the dress and Sew all the way along from the sleeve end to the hem and then repeat for the otherside and voile you have a dress now just onto the zip and hem the sleeves and bottom of the dress! Nearly there peeps!

Now onto the tricky part, Pin one side of the zip Right Sides Together to the Back Bodice and then tack to secure as this will make it stay in place easier than pins when sewing. Remember to change your foot to the invisible zip foot and to stitch as close as possible to the Zip teeth and when sewing try to get as near to the bottom of the zip as you can. Then repeat onto the other side but remember to check that the zip is aligned at both sides as you don’t want a mismatched length zip lol!


Now turn the dress inside out and change back to your regular foot and sew from the last stitch on the zip to continue all the way down to the bottom of the dress.
Now to finish the zip at the top, as you will see ive stitched the zip onto the facing, hang on it will disappear! Turn the facing to the inside and pin it so it meets with the zip in the inside and hand stitched to secure and then iron the facing so it laid flat inside

and it should look like this:

Boom! Lovely neat Zip ends!!
Now all you need to do now is sew the sleeve hems and bottom of the dress I’ve used 2.5cm hem for my sleeves and 1cm for my bottom hem and hey presto you have a lovely Skater Dress as modeled by moi!!
The Front:

The back:

Please excuse the tannage line at the back LOL But this is a real gem to sew!
A big thank you to Laura at Sew Scrumptious who provided the Lovely fabric for me to make this dress it’s called Notting Hill Birds Lilac by Gutermann It’s 100% Organic Cotton and 145cm wide which is perfect width to make this dress. She has a lovely wide range of fabrics so please go and have a nosey and treat yourselves! Plus she has speedy delivery times too a total bonus when you need your fabric fix!
Now i hope you have found my tutorial helpful and if you have any questions please get in touch!!
Happy Sewing
Sal x


Wow what a fantastic detailed tutorial. I love your finished dress!
Thanks beth x
Great tutorial! Your dress looks so lovely on you!
Thank you ?
Love the dress! Looks amazing. Will share on all my social media. x
Thank you so much for the photos and details on how to do the zip. I’ve been making the Ruby dress and was a little stuck on the top of the zip and facing position this has answered my questions. Thank you again.
Your very welcome Laura! ?
[…] The Skater Dress is one of the most viewed tutorial on my blog so why not have a go at making yours with ease with my detailed instructions to guide you through from the beginning to the end! […]
[…] is already a very good sewing tutorial for the Skater Dress at sewsweetsally’s blog, so there’s no need for me to reinvent the wheel. But when I picked this pattern, I knew I was […]